Title here
Summary here
Alerts are available in DBA Dash starting from 3.17.0.
Alerts can be setup in DBA Dash to provide instant notification for issues that require your immediate attention. Alerts need to be configured before you start receiving alerts. The rules, thresholds and notification schedules can be tailored to your environment.
Receiving alert notifications for issues that don’t require your attention is often a bigger problem than not receiving a critical notification. A noisy alert system quickly creates alert fatigue and users will start to ignore notifications or important notifications might be lost in a flood of alerts.
Alerts don’t replace the need for daily DBA checks and the absence of notifications doesn’t mean everything is in a good state. The Summary tab in DBA Dash provides a good compliment to alerts. In some cases it will allow you to deal with problems before they become critical enough for an alert notification (e.g. disk space issues.).
An alert rule defines a condition that you want to be notified about. To create a rule:
Click the Configure button on the Alerts tab in the GUI.
Click the *Add Rule button on the Alert Configuration window.
Select a rule type. The following rule types are currently available:
Receive a notification when a job fails. The rule can be filtered by job name or category (with LIKE syntax support)
The agent job rule can be used for custom notifications by creating a job that will fail based on your condition
Configure the rule

Tags are a great way to simplify your alert configuration.
If you want to have a different priority based on the threshold, click the Copy link in the grid to clone the existing rule and change the threshold and priority. The rules will map to the same alert key and will generate a single event, the higher priority rule taking precedence. The same applies if you have a rule that you want to apply to a different tag - clicking the Copy link will save time. A server with both tags will still generate a single event.
A notification channel defines where to send the alert notification. To create a channel:
Click Add Channel on the alert configuration window. Select from the menu options:
Configure the channel.
You can apply schedule filters to notification channels to control which alerts a channel receives based on:

Schedules have an associated re-trigger threshold which is the minimum delay required before sending an updated alert notification. By default you will receive updates every 10 minutes and a maximum of 6 (configurable in Options\Repository Settings) notifications will be sent for each alert. For Slack and Google chat alerts, updates are sent to the previous conversation thread.
Sensitive information associated with the notification channel is stored in the repository database. Data masking is used to limit access to sensitive information and users will receive a “Insufficient permission to access notification channel details” error if they try to edit a channel without appropriate permissions to unmask the data. Sensitive data is obfuscated even if you have permissions to unmask, preventing casual viewing of the data.
The Teams notification channel is available in DBA Dash starting from 4.21.0. For older versions, use a Webhook channel with a custom message template (see #1339).
Alerts are posted to a Teams channel as an Adaptive Card using a Teams Workflow. To get the Workflow URL:
In DBA Dash, click Add Channel and select Teams. Paste the URL into Workflow Url and give the channel a name. Once saved, click the Test link for the channel to send a test notification.
The older Incoming Webhook connector (URLs containing webhook.office.com) is being retired by Microsoft. Create a Workflow instead.
With the unmodified Send webhook alerts to a channel workflow, Teams accepts the request before the workflow runs, so DBA Dash can report that a notification was sent even if it doesn’t appear in Teams. If this happens, open the Workflows app in Teams, select the workflow and check the run history for failed runs. The details show why the message wasn’t posted.
The workflow runs as the user who created it. If that user leaves the organization or their account is disabled, the workflow will stop working. Consider creating the workflow with a service account.
DBA Dash’s own Message Template field (on the notification channel, separate from the Teams workflow template selected in step 3) is optional. Leave it blank to use the default card. To customize the message, provide JSON in this format. The Adaptive Cards Designer can help you design the card. Select Microsoft Teams as the host app to preview how it will look.
{
  "type": "message",
  "attachments": [
    {
      "contentType": "application/vnd.microsoft.card.adaptive",
      "contentUrl": null,
      "content": {
        "$schema": "http://adaptivecards.io/schemas/adaptive-card.json",
        "type": "AdaptiveCard",
        "version": "1.4",
        "body": [
          { "type": "TextBlock", "text": "{Emoji} {Title}", "weight": "Bolder", "size": "Medium", "wrap": true },
          { "type": "TextBlock", "text": "{Instance}", "isSubtle": true, "spacing": "None", "wrap": true },
          { "type": "TextBlock", "text": "{Text}", "wrap": true }
        ]
      }
    }
  ]
}
Available placeholders: {Title}, {Text}, {Instance}, {ConnectionID}, {InstanceAndConnectionID}, {AlertKey}, {Action}, {Icon}, {IconUrl}, {Emoji}, {Priority}, {PriorityBucket}, {TriggerDate}, {Now}, {CloudProvider}, {CloudResourceID}, {CloudRegion}, {CloudAccountID}.
With the unmodified Send webhook alerts to a channel workflow, each notification for an alert (including when it’s resolved) is posted as a new message. To post updates as replies to the original message, edit the workflow so it returns the ID of the message it posts. DBA Dash stores the ID and includes it as replyToMessageId in the body of later notifications for the alert.
Edit the workflow so it does the following after the When a Teams webhook request is received trigger:
empty(triggerBody()?['replyToMessageId']) is equal to true.triggerBody()?['attachments'][0]['content'].200. Add a header named MessageId with the Message ID output from the previous step.triggerBody()?['replyToMessageId']. For the Adaptive Card, use triggerBody()?['attachments'][0]['content'].200.The MessageId header is preferred, but DBA Dash will also accept the message ID in the response body. Either as the body on its own, or as JSON: {"messageId": "..."}.
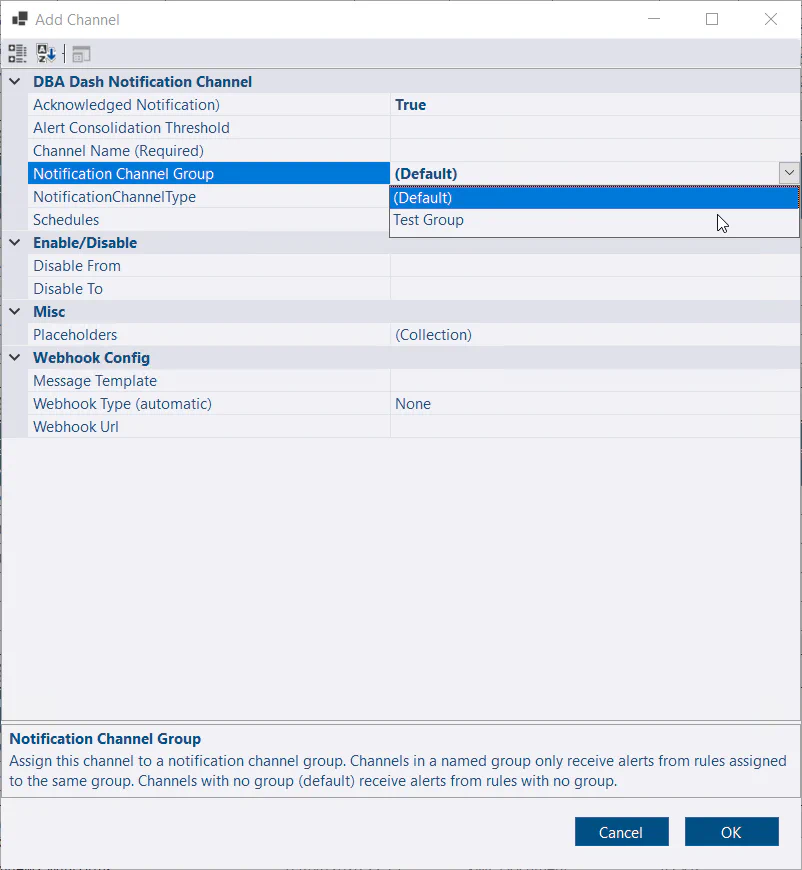
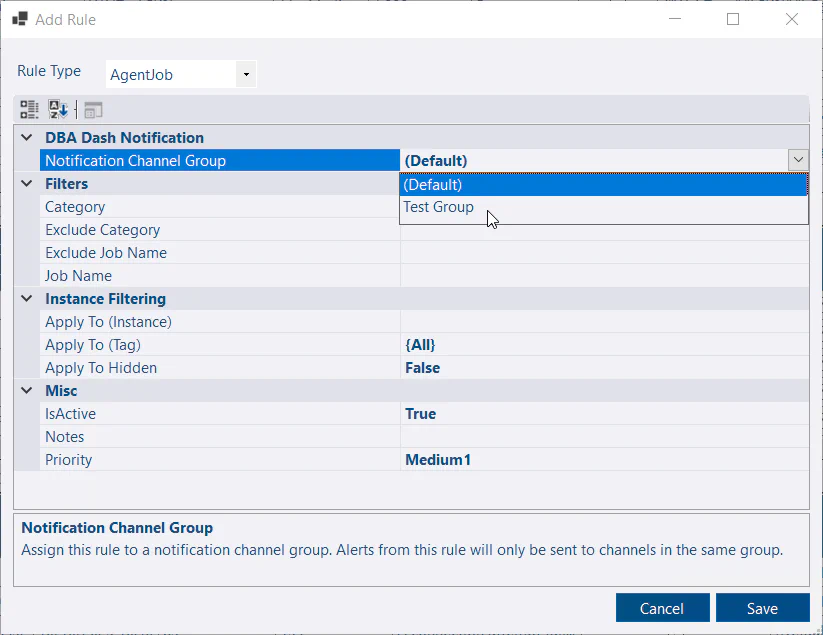
Notification channel groups let you target alert rules to specific sets of notification channels (email, Google Chat, Slack, Teams, PagerDuty, etc.). A default group is created automatically and additional groups can be created if required.

DBA Dash can send desktop notifications (popup window) while you are using the GUI. To receive desktop notifications, check the Desktop Notifications from the options menu. If desktop notifications are disabled, there is still a visual cue in the application that you have alerts that require your attention in the menu area on the top right. This shows the number of active alerts and the number that require your attention (alerts that are not resolved or acknowledged).

A blackout defines when alerts are not monitored - e.g. For maintenance. Alerts are not generated during the blackout. If an alert is active at the time of a blackout, it’s status is changed to indicate that it is now in blackout.

If you want to disable alerts for the next hour, click Add Blackout on the Alert Configuration window. The start date and end date already default to the next hour - adjust these if required. The rest of the configuration can be left to the defaults - click OK to create the blackout. More advanced configuration is available, including scheduled blackouts and blackouts targeting specific alerts and instances.
By default, the service config tool is already configured to process alerts. If you have multiple services, only one of the services will process alerts at a time. In some cases you might want to control which service processes alert notifications (maybe outbound connections are disabled preventing notifications). On the Options tab you have the following alert configuration options:

An alert can be acknowledged by clicking the Acknowledge link in the grid or selecting Acknowledge alerts from the Actions menu. Once acknowledged, notifications for the alert will be muted. Notifications are also muted once the maximum number of notifications is reached (Configurable in Options\Repository Settings).


You can add notes to the alert to explain the root cause by clicking the link in the Notes column. This can be a simple line of text or a full RCA written in markdown. You can also add the same notes to multiple alerts by selecting them in the grid and using the option from the Actions menu.
Once an alert has been resolved it will be automatically closed after a period of time (Configurable in Options\Repository Settings). You can also Close alerts manually by clicking the Close link or the option from the Actions menu. Once closed, a new alert will be generated if the rule is triggered again. This will reset the notification count and start new threads in Slack and Google chat. To see Closed alerts, click the History button on the Alerts tab.
SQL Server has built-in alert capabilities that can be used alongside DBA Dash. For example, you can configure alerts for high severity errors, corruption, performance conditions & job failures.